Showing posts with label martha freaking stewart. Show all posts

Monday, 9 February 2015

Chicken Burritos with Mexican Rice

Chicken Burritos with Mexican Rice

Chicken Burritos with Mexican Rice Recipe

INGREDIENTS

cups chicken stock
cup long grain rice
1/2 
bunch of finely chopped coriander leaves
Juice of a lime
600 
skinless chicken fillets cut into strips
small onion cut into thin wedges
tablespoons olive oil
Old El Paso™ Burrito Kit
Whole Iceberg lettuce leaves

THE DIRECTIONS

  • 1Bring stock to the boil add rice, cover and simmer for 20 minutes. Stir through coriander and lime juice.
  • 2While rice is cooking, toss chicken, onion, oil and Burrito Seasoning together in a bowl. Cook seasoned chicken in a frying pan over medium/high heat for 4-5 minutes or until golden brown.
  • 3For warm and soft Tortillas, open Tortilla pouch, discard Freshness Sachet. Microwave Tortillas in pouch on HIGH/1100 watts/100% power for 40 seconds* or remove from pouch, wrap in foil and heat in oven at 180ÂșC conventional (160°C fan forced) for 10 minutes. *Times may vary depending on microwave wattage. Decrease time for fewer Tortillas. Increase time when using a microwave oven lower than 1100 watts.
  • 4Serve warmed Tortillas filled with lettuce, Mexican rice, and chicken and topped with Mild Mexican Salsa.
Find the recipe here!!

I am that over coming up with dinner ideas lately it is a complete joke.  So when the HOTH pointed this recipe out in a magazine a few weeks ago I was all over it!!  

I cooked plain chicken for the kids and gave them rice without coriander.  I had brought them some bread rolls but they ended up eating the tortillas!!  So next time I make it I will be adding some frozen veg in with the rice and buying an extra pack of tortillas!!  

I call this a winning meal as it was easy, quick and we all ate it (which is rare)!!

Linking up with One Mother Hen for #openslather


Friday, 6 June 2014

Chocolate Spiders

#notafoodblogger!!


Ingredients:

1 pkt Chang’s Original Fried Noodles (100g)
2 Tbspns Crunchy Peanut Butter
200g Cooking Chocolate (milk or dark)

Method:
Microwave chocolate and peanut butter in microwave safe mixing bowl for about 30 seconds on high. If not melted, then microwave again in 5 second intervals. Mix well until it is a smooth paste. Add noodles and coat them well. Spoon the mixture onto grease-proof paper, or into individual paper patty pans. Using heaped teaspoons, this mixture will yield 30 to 40 spiders.
Place in refrigerator until set.
Please note this recipe contains peanuts.
Tip
Chocolate melts also works well with this recipe. It gives a smoother texture.
The spiders can be kept in a sealed container in refrigerator for up to 2 weeks.
They can be kept in freezer for even longer time.

Seriously the easiest recipe ever!!  A great one for kids to help with. The 3 year old and I had a blast yesterday making these.  They do have peanut butter in them but I think you can probably not use it and they would still be yum although I am no Martha so don't take my word for it!!  I also only had smooth peanut butter but I can't imagine that makes a huge difference.

Linking up an unprecedented quadruple whammy with Lauren and Lucy from Fabulous Foodie FridaysMums Take Five for Sunday Brunch and One Mother Hen for #openslather and the lovely ladies from Melting Moments for their Weekly Wrap Up

Friday, 16 May 2014

Mango and coconut muffins

Set of Five Bakery Muffins
Image from here


Ingredients

  • 1 3/4 cups sifted self raising flour
  • 1 1/4 cups desiccated coconut
  • 2/3 cup brown sugar
  • 1/2 cup buttermilk (or normal milk if you never remember to buy buttermilk!!)
  • 2 lightly beaten eggs
  • 75g melted butter
  • 1 roughly chopped mango
Method

  • Preheat oven to 190 degrees
  • Spray a 12 hole muffin tray with cooking spray
  • In a bowl mix flour, coconut and sugar.  Make a well in the centre.
  • In a separate bowl combine, buttermilk, eggs and butter.
  • Use a large metal spoon or spatula to fold the buttermilk mixture into the flour mixture.
  • Add the mango and fold until just combined.
  • Spoon the mixture into the prepared pan.
  • Bake for 18-20 minutes or until golden and cooked through.
  • Remove from oven and stand for several minutes before transferring muffins to a wire rack to cool.
  • These muffins can be kept in an airtight container for up to three days.  I don't see why you couldn't freeze these??
  • As an alternate to mango try fresh peach or apricot.  I have also used tinned fruit drained really well.
While on the hunt for our elusive camera I came across this recipe I had ripped out of the paper (4/2/09)!!  I used to make these regularly with a variety of fruits.  I love this recipe as it is all pantry staples, easy and tasty!!  

I will give these a whirl again over the weekend as I am looking for something new and sort of healthy for lunchboxes and baby snacks.  Also perfect timing as I put my name down for morning tea at playgroup and the letter for that week will be M.  Hello muffins and Mexican (corn chips and salsa!!).  These will be perfect to make plus I have a mini muffin tin somewhere so I will make a couple of different varieties of muffins.  Too easy!!

Linking up for Sunday Brunch with Mum's Take Five and for the first ever Fabulous Foodie Fridays with bake play smile and create bake make (head over to either of the links to find out more on this one!!  You have been warned that visiting any of these blogs will make your weight increase and you will drool all over your computer!!)
http://www.mumstakefive.com/

Feel free to link up with the link up that lives here Things I Know #tik.  I love knowing what other people know!!  You are totally welcome to link up anything!!  Link opens at 6am Friday and is open all week.

Also linking this with
for #openslather!!

Monday, 17 February 2014

Catching up

Today I thought I would catch up on a few little things.

Firstly if you caught my Mexican cob loaf recipe a couple of weeks ago and were wondering how it had turned out well it was delicious and has now become my new take a plate!!  I do have to admit that I did not actually make it, the HOTH did (under strict instructions from the boss)!!  I actually meant to take a few photos but ended up forgetting.  Not entirely my fault I blame the wine!!  A total comedy of errors from the start, lets just say it was just a Mexican loaf as the bread shop had sold out of cobs!!

Next up school.  We are into week 4 here although technically this is the start of the 3rd full week.  So far my big grown up kindy kid is going great.  We are all getting used to the new normal!!

I am on a mission trialling lunchbox/snack foods as lord knows it is painful making a healthy lunchbox 5 days a week.  I already have a few recipes up my sleeve but will gladly add some more.

I saw One Mother Hen's WeetBix Slice and gave it a go yesterday.  Ding ding ding we have a winner, 24 hours on and there is 3 pieces left.  This recipe is going in my file for sure.

Linking up this short but sweet post with One Mother Hen for Open Slather and with Mums Take Five a day late for Sunday Brunch!!

Monday, 27 January 2014

Mexican Cob


Ingredients:
  • 1 cob loaf
  • 300 mls sour cream
  • 1 packet taco seasoning
  • 4-6 tablespoons tomato salsa (we used medium, depending on taste use mild,medium,hot)
  • 1/2 cup grated cheese
Pre heat oven to 180 degrees.
Place sour cream in a bowl and mix in taco seasoning. Cut the top off cob loaf and remove the bread centre. Spoon1/2 of sour cream a layer on the bottom of cob, then spread 2-3 tablespoons of salsa and 1/4 cup grated cheese. Spoon remainder of sour cream mix, then salsa, then top with cheese.
Place cob on oven tray. Break bread centre into small bite size pieces and place around cob, put cob lid on and bake for 15-20 minutes until bread is golden brown.
Recipe Hints and Tips:
  • Mexican Cob Dip can be made the day before, wrapped in aluminium foil and baked at 150 degrees for an hour before serving.
  • You may need to double the filling ingredients if you have a particularly large cob loaf.
I totally stole this from Stay at Home Mum and am giving it a crack for a bbq this weekend.  Being super organised and actually having this post scheduled all ready for Open Slather with One Mother Hen means you will have to wait until next week for an update on how it went!!  

I am looking forward to trying this one as I love Mexican food and cob loaf dips, its a match made in heaven!!

Monday, 9 December 2013

Rocky road


Normally at this time of year I would be busting out my you beaut chocolate truffles however this year I simply do no have time for anything like that unfortunately.  It is take a plate to preschool on Wednesday and I decided to make rocky road as it is so simple!!  So simple I cannot believe I have never made it before!!

I made a test batch yesterday and used 375g choc melts, about 8 arrowroot biscuits, about 15 marshmallows cut in half and a few raspberry lollies also cut in half.  While the chocolate was melting in a bowl over a pot of water I chopped the marshmallows and lollies and broke up the biscuits then mixed it together and spread it in a lined pan.  A couple of hours in the fridge and it was good to go.  I think it has made enough for a "plate".  I will chop it up into smallish pieces so it goes a little further.

Seriously tasty and easy!!  I made it nut free but the variations on this are endless, there isn't much you couldn't put in it.

Linking up for #openslather with One Mother Hen

Monday, 25 November 2013

Some facts and garlic

THINGS YOUR MOTHER SHOULD HAVE TOLD YOU 

1. Take your bananas apart when you get home from the store. If you leave them connected at the stem, they ripen faster.


2. Store your opened chunks of cheese in aluminum foil. It will stay fresh much longer and not mold!


3. Peppers with 3 bumps on the bottom are sweeter and better for eating. Peppers with 4 bumps on the bottom are firmer and better for cooking.


4. Add a teaspoon of water when frying ground beef. It will help pull the grease away from the meat while cooking.


5. To really make scrambled eggs or omelets rich add a couple of spoonfuls of sour cream, cream cheese, or heavy cream in and then beat them up.


6. For a cool brownie treat, make brownies as directed. Melt Andes mints in double broiler and pour over warm brownies. Let set for a wonderful minty frosting.


7. Add garlic immediately to a recipe if you want a light taste of garlic and at the end of the recipe if your want a stronger taste of garlic.


8. Leftover snickers bars from Halloween make a delicious dessert. Simply chop them up with the food chopper. Peel, core and slice a few apples. Place them in a baking dish and sprinkle the chopped candy bars over the apples. Bake at 350 for 15 minutes!!! Serve alone or with vanilla ice cream. Yummm!


9. Reheat Pizza
Heat up leftover pizza in a nonstick skillet on top of the stove, set heat to med-low and heat till warm. This keeps the crust crispy. No soggy micro pizza. I saw this on the cooking channel and it really works.


10. Easy Deviled Eggs
Put cooked egg yolks in a zip lock bag. Seal, mash till they are all broken up. Add remainder of ingredients, reseal, keep mashing it up mixing thoroughly, cut the tip of the baggy, squeeze mixture into egg. Just throw bag away when done easy clean up.


11. Expanding Frosting
When you buy a container of cake frosting from the store, whip it with your mixer for a few minutes. You can double it in size. You get to frost more cake/cupcakes with the same amount. You also eat less sugar and calories per serving.


12. Reheating refrigerated bread
To warm biscuits, pancakes, or muffins that were refrigerated, place them in a microwave with a cup of water. The increased moisture will keep the food moist and help it reheat faster.


13. Newspaper weeds away
Start putting in your plants, work the nutrients in your soil. Wet newspapers, put layers around the plants overlapping as you go. Cover with mulch and forget about weeds. Weeds will get through some gardening plastic they will not get through wet newspapers.


14. Broken Glass
Use a wet cotton ball or Q-tip to pick up the small shards of glass you can't see easily.


15. No More Mosquitoes
Place a dryer sheet in your pocket. It will keep the mosquitoes away.


16. Squirrel Away!
To keep squirrels from eating your plants, sprinkle your plants with cayenne pepper. The cayenne pepper doesn't hurt the plant and the squirrels won't come near it.


17. Flexible vacuum
To get something out of a heat register or under the fridge add an empty paper towel roll or empty gift wrap roll to your vacuum. It can be bent or flattened to get in narrow openings.


18. Reducing Static Cling
Pin a small safety pin to the seam of your slip and you will not have a clingy skirt or dress. Same thing works with slacks that cling when wearing panty hose. Place pin in seam of slacks and ... guess what! ... static is gone.


19. Measuring Cups
Before you pour sticky substances into a measuring cup, fill with hot water. Dump out the hot water, but don't dry cup. Next, add your ingredient, such as peanut butter, and watch how easily it comes right out. (Or spray the measuring cup or spoon with Pam before using)


20. Foggy Windshield?
Hate foggy windshields? Buy a chalkboard eraser and keep it in the glove box of your car When the windows fog, rub with the eraser! Works better than a cloth!


21. Re-opening envelopes
If you seal an envelope and then realize you forgot to include something inside, just place your sealed envelope in the freezer for an hour or two. Viola! It unseals easily.


22. Conditioner
Use your hair conditioner to shave your legs. It's cheaper than shaving cream and leaves your legs really smooth. It's also a great way to use up the conditioner you bought but didn't like when you tried it in your hair.


23. Goodbye Fruit Flies
To get rid of pesky fruit flies, take a small glass, fill it 1/2' with Apple Cider Vinegar and 2 drops of dish washing liquid; mix well. You will find those flies drawn to the cup and gone forever!


24. Get Rid of Ants
Put small piles of cornmeal where you see ants. They eat it, take it 'home,' can't digest it so it kills them. It may take a week or so, especially if it rains, but it works and you don't have the worry about pets or small children being harmed!


25. Dryer Filter
Even if you are very diligent about cleaning the lint filter in your dryer it still may be causing you a problem. If you use dryer sheets a waxy build up could be accumulating on the filter causing your dryer to over heat. The solution to this is to clean your filter with with a toothbrush and hot soapy water every 6 months.


This was doing the rounds on facebook and I found some of it really interesting!!  Also I loved this idea by the queen herself!!


Linking up for #openslather with One Mother Hen

Monday, 28 October 2013

Soda Pop Cupcakes


Makes 12
* 340g (12oz) Vanilla cake mix
* 1 Cup (250ml) Raspberry Soft Drink (soda).
Method: Preheat Oven to 180C/360F. Into a large bowl, pour the cake mix, then add the soda (soft drink). Stir together with a wooden spoon the mixture evenly among each. Bake for 15 minutes or until puffy and cooked thru. 

I stole these from the 4 ingredients website.  

These popped up a couple of times on my facebook feed a couple of weeks ago so I tried it as a cake which was a disaster never to be spoken of again (think undercooked cake and shockingly made icing) but the idea was right.  I will try orange drink with chocolate icing next time and make them into cupcakes not a whole cake!!  

Something easy and simple for Open Slather with One Mother Hen

Monday, 14 October 2013

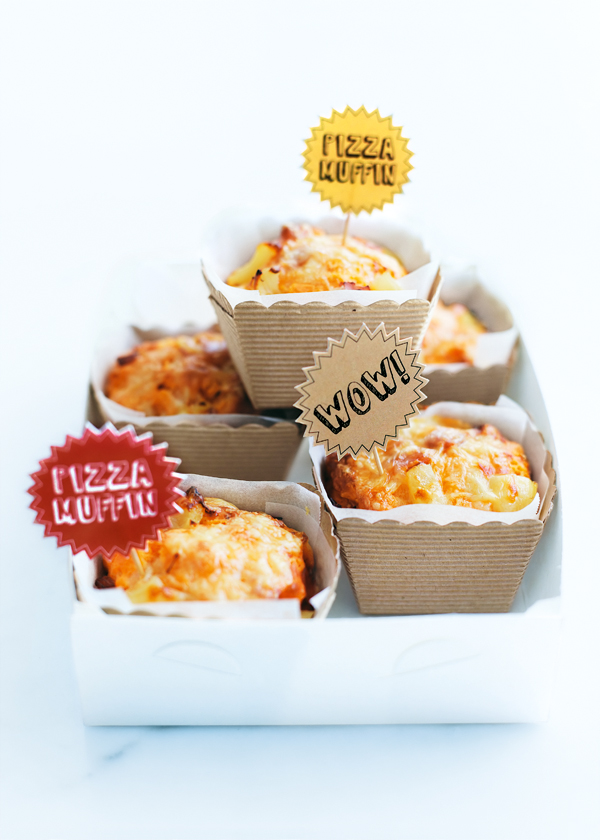
Pizza Muffins

pizza muffins


pizza muffins
  • 3 cups (450g) self-raising (self-rising) flour, sifted
  • 1 teaspoon baking powder
  • 1½ cups (180g) grated cheddar
  • 150g ham, chopped
  • ⅔ cup (150g) chopped pineapple, drained
  • ⅔ cup (160ml) vegetable oil
  • 2 tablespoons tomato paste
  • 2 eggs
  • 1 cup (250ml) milk


I am loving the new Pearl Jam song!!  Just thought I would pop it in too.

Have a great week guys, the countdown is on here until Monster Truck Saturday!!  Other than that its looking like the same old week here!!

Linking up for Open Slather with One Mother Hen.

Monday, 23 September 2013

The Asparagus Dish


Asparagus, I love it!!  Fresh or canned.  With the fresh stuff being so cheap at the moment we have had it a couple of times in the last few weeks.  With the fresh asparagus I wrap it in foil with some butter and garlic then put it on the bbq for about 5 minutes.  Last week as I had the oven on to cook a meatloaf I wrapped it in foil with butter and put it in the oven.  I have also made it the Jamie Oliver way by wrapping each piece in prosciutto and then roasting it in the oven.

Last week One Mother Hen shared her recipe for Asparagus soup using canned asparagus which made me think of one of my favourite recipes using canned asparagus.  It is made by one of my very good friends and I love it!!  I love going to her place for a bbq as she always whips it up!!  I have made it a few times and it is so easy and delicious.  It is easy to adjust the recipe depending on how many you are serving.  I make it to serve 2.

Put one can of asparagus (drained) and 2 halved hard boiled eggs in a baking dish, make a basic white sauce, pour over asparagus and eggs, top with breadcrumbs and grated cheese and bake or grill until cheese is melted and breadcrumbs are crispy.

I love this recipe as you can make it your own. I add cheese to my white sauce as I love cheese and I have also put garlic in the sauce.  You could use cheddar and parmesan cheese.  I was going to be lazy and try just cream over the top rather than make a sauce, not sure how that one will work but it could be another option!!

I think I have the recipe right!!  I did double check with my friend!! Also it does not have a name it is just referred to as The Asparagus Dish!!

Linking up with One Mother Hen for Open Slather.

Tuesday, 18 June 2013

Berry and Apple Slice

Ingredients
  • Cooking oil spray, for greasing.
  • 150g (1 cup) self-raising flour
  • 90g (1/2 cup) rice flour
  • 55g (1/2 cup) almond meal
  • 80g (1/3 cup) caster sugar or 1/3 cup granulated sugar substitute
  • 250ml (1 cup) buttermilk
  • 2x50g eggs
  • 400g can no-added-sugar apple slices
  • 120g (1 cup) frozen raspberries
Method

  1. Preheat oven to 170deg (fan-forced).  Grease an 18x28cm slab tin with cooking oil spray and line with baking paper, allowing paper to overhang sides.
  2. Put flours, almond meal and sugar in a large bowl and stir to combine.  Put buttermilk and eggs in a small bowl and whisk to combine.  Add buttermilk to flour mixture with apples and raspberries and mix to combine.
  3. Spoon mixture into prepared tin and smooth surface.  Bake for 40-45 minutes or until cooked when tested with a skewer.  Cool in tin for 15 minutes, then transfer to a wire rack to cool completely.
  4. Cut slice crossways into 7 pieces, then lengthways into 5 pieces.  Serve.
  5. Keep in an airtight container in the fridge for up to 3 days.  Or wrap in plastic wrap, put in resealable freezer bags and freeze for up to 3 months.
  6. 1 piece=1 serve/exchange.
I got this recipe from the May/June issue of Diabetic Living magazine.  This is the recipe I promised in yesterdays post!!

This is easy and delicious and I love how I can have a couple of pieces guilt free!!  It does not last long at our house and is here to stay on my baking list after Jellybean arrives and I no longer have gestational diabetes!!

Linking up this rewritten post (long story best not to ask what happened!!) with Essentially Jess for ibot!!

Monday, 27 May 2013

Jamie Oliver's Grilled Mushrooms

Jamie Oliver's Grilled Mushrooms

MUSHROOMS
  • 4 large flat Portobello mushrooms (approx 250g/ 9oz in total)
  • 2 cloves of garlic
  • ½ fresh red chilli
  • 2 sprigs of fresh flat-leaf parsley
  • ½ lemon
  • 70g (2½oz) mature Cheddar cheese

MUSHROOMS: Lay the mushrooms, stalk side up, on a chopping board. Trim the stalks and place the mushrooms stalk side up in a small earthenware dish that they fit into fairly snugly.
Crush ½ an unpeeled clove of garlic over each mushroom. Finely chop ½ a red chilli and a couple of parsley sprigs, and divide between the mushrooms. Grate over the zest of ½ a lemon, drizzle well with olive oil and season. Cut the Cheddar into four chunks and pop one on each mushroom.  Grill on the top shelf for 9 to 10 minutes, or until golden
I pinched this from here but it is actually out of Jamie Oliver's 30 minute meals recipe book.  I love this recipe and book although I pick and choose individual things and have never actually made an entire meal!!  This is such an easy quick idea!!  I made these without chilli for the kids (who didn't eat them) and they were just as good without if you are not a big fan of chilli!!

Linking up with One Mother Hen for Open Slather and thanks to One Mother Hen whose Wordless Wednesday post jogged my memory about this recipe!!

Ps still no spell check so please excuse any errors!!

Friday, 24 May 2013

Things I Know - 24/5/13 umm how is it the end of May already!!

I figure my exciting news from last week deserves a post of its own.

I am officially going to BON JOVI WHOOOOOOOOOOOHOOOOOOOOOOOO!!

There is approximately 194 days until the big day!!  Not that I am counting!!


I know that I will be very happy if they play this set list!!

Also more importantly there is at the most 68 days until baby jellybean makes an appearance.  The one positive from having gestational diabetes is that I will more than likely be induced before the due date.

I know I have a busy weekend ahead with the room shuffle or put up the 2 year olds bed, move the cot into the babies room, sort out the boys bedroom and do a little Martha decorating magic.  Also cleaning out the babies room which has become a slight dumping ground. 

At least once this is all done there should be a little less to do and more time for relaxing!!  Thats the plan anyway!!

I also know I have some research to do on low gi winter recipes.  Last time I had gd it was summer so the menu was easy. 

Other stuff I know is that I am loving the cooler rainy weather this last few days, even if it means we are stuck inside!!

Have a fab weekend guys!!  Anyone have a low gi healthy recipe or know of a website etc they care to share??!!

Linking up a cheeky Friday arvo the kids are sleeping post with Saturday Morning Ogre Mum!!


Monday, 20 May 2013

Cheesy Chicken Rice Casserole

Picture of Cheesy Chicken & Rice Casserole Recipe

Ingredients

  • 1 can (10 3/4 ounces) Campbell's® Condensed Cream of Chicken Soup (Regular, 98% Fat Free or Healthy Request®)
  • 1 1/3 cups water
  • 3/4 cup uncooked regular long-grain white rice
  • 1/2 teaspoon onion powder
  • 1/4 teaspoon ground black pepper
  • 2 cup frozen mixed vegetables
  • 1 1/4 pounds skinless, boneless chicken breast halves
  • 1/2 cup shredded Cheddar cheese (about 2 ounces)

Directions

Heat the oven to 375 degrees F. Stir the soup, water, rice, onion powder, black pepper and vegetables in a 2-quart shallow baking dish.
Top with the chicken. Cover the baking dish.
Bake for 50 minutes or until the chicken is cooked through and the rice is tender. Top with the cheese. Let the casserole stand for 10 minutes. Stir the rice before serving.

Cheesy Chicken Rice Casserole

I found this recipe last year thanks to someone posting the link on facebook.  I cannot believe I never came across something like this before.  It is so easy!!

I have found it takes longer than 50 minutes even in a working oven (first time I made it was in a dodgy non fan forced oven).  I also cut and flatten the chicken so it cooks evenly and quickly.  Another option is to just do the rice without adding the chicken, this way you can use any flavour soup and serve it with whatever!!  This is definitely added to my winter menu from now on!!

Linking up with One Mother Hen for Open Slather.

Ps sorry about the American measurements!!

Monday, 6 May 2013

Maple syrup vegies

Judging by the weather forecast I think its pretty safe to say that is no longer salad for dinner weather so its time to get back into some cooked vegies.  I thought I would share a quick easy alternative to roast/baked veg.

Simply par boil (or fully boil if you forget you have a pot on the stove!!) whatever veg you would normally bake.  I usually do potato, sweet potato, carrot, parsnip etc.  Mix together a crushed clove of garlic, a tablespoon or 2 of whole grain mustard and about 3 tablespoons of maple syrup in a big bowl.  Add in the cooked veg and mix around.  Pop into a baking dish and bake in the oven on about 180 for about half an hour.  Easy!!

Don't be put off by the weird ingredients, when it is cooked it is really yummy!!  I think this may be a Weight Watchers recipe but I got it off a family member so I am no too sure!!

On Saturday I did a little post about having to go for the 2 hour fasting glucose test for gestational diabetes this coming Saturday and I am asking everyone who pops in this week to send me some positive vibes for a negative outcome this time around!!

Have a great week Open Slatherers!! 

Linking up with One Mother Hen for some Monday fun!!

Monday, 29 April 2013

A couple of weeks of baking

Chewy anzac biscuits

No bake vanilla slice

The kids and I made ANZAC bickies last weekend before ANZAC day.  The weather was atrocious, perfect for baking and after some googling I found a recipe and surprisingly had all the ingredients in the cupboard. 

The bickies turned out to be so easy and yummy however not chewy as I had to change a nappy just as the timer went off and should have take them out first!!  Still a big tick all round and definitely on my baking list from now on!!
    I
The vanilla slice came about as all last week I had been dying for a vanilla slice however our bread shop did not have any!!  The recipe was easy enough but definitely needed longer in the fridge (my fault as I should have made it earlier in the morning).  Also the icing was slightly dodgy but I am not the worlds best icing maker!!  Still a definite make again!!

I am making this short and sweet thanks to blogger and its love of eating my posts lately!!  Last week was one of "those" weeks and this week is shaping up to be just as swear worthy!!

Linking up with One Mother Hen for Open Slather.


Monday, 11 March 2013

Mini Frozen Lemon Cheesecakes


Frozen Mini Lemon Cheesecakes

  • 10 Arnott’s Granita Biscuits
  • 250 grams Coles Brand Spreadable Cream Cheese, at room temperature
  • 1/2 cup Masterfoods Lemon Butter, plus extra to serve
  • 500 ml Coles Brand Classic Vanilla Ice-cream
  • 2 tbsp Finely Chopped Pistachios


  • Line 10 large muffin cups with paper cases.  Place a biscuit in the base of each case.
    Mix together cream cheese and lemon butter in a large bowl with a wooden spoon.
    Scoop spoonfuls of ice cream in and leave for 5 mins to soften,
    Using a metal spoon combine ice cream and cream cheese mixture and immediately spoon into paper cases.
    Freeze for 4 hours or overnight,
    Serve with extra lemon butter and pistachios (optional),

    Dessert is one of my favourite things.  We usually have a something twice a week.  Normally its something I have baked like cake or muffins but last week the HOTH (being a bit of a smart ass) saw this recipe in the coles magazine and made a few comments on how these looked out of my league to make, so I did!!

    Talk about easy and delicious.  Seriously yum and the best bit is that being frozen they cannot be packed in a lunchbox so dessert is done for the next week or so!! 

    You can use any cream cheese, ice cream or lemon butter and I used ginger nuts as my supermarket did not have granitas.  Next time I will see how a different flavour jam goes.

    Linking up with One Mother Hen for some Monday Open Slather!!

    Monday, 4 March 2013

    The best ever Chocolate Self Saucing Pudding

    Not my picture but you get the idea!!

    1 cup self raising flour
    3/4 cup caster sugar
    1/2 cup milk
    30grams butter, melted
    1/4 cup cocoa
    3/4 cup brown sugar
    1/4 cup cocoa
    1 1/4 cups hot water

    1. Sift flour, caster sugar and cocoa into a bowl.
    2. Mix in milk and butter.
    3. Pour into an ovenproof dish
    4. Sift the other 1/4 cup of coca into a bowl (or large heatproof jug if you have one)
    5. combine cocoa, brown sugar and hot water (I use boiling water) mix until all the lumps are gone.
    6. Pour gently over the cake mixture
    7. Bake at 180 deg (160-170 fan forced) for 45-50 minutes
    8. Enjoy!!
    I have been making this for about 20 years!!  The recipe comes from The Woman's Weekly Beginners Cookbook (I think thats the name).  It is so simple and so delicious!!  I usually make double the sauce so 1 1/2 cups brown sugar, 1/2 cup cocoa and 2 1/2 cups hot water.  You need a fairly deep dish to make it in too or it overflows!!
    This recipe is the start of My Favourite Things which is a little theme around here for the rest of the month.  I am doing this as we just ticked over to March which is by far one of my favourite months as not only is it my birthday soon but it means the weather is near perfect with warmish days and cooler nights just the way I like it!!

    Blogging is also one of my favourite things and I love love love Open slather with One Mother Hen!!

    So today is favourite month and winter dessert.  Whats yours??!!